Automating with Grasshopper (AdSecGH)
This guide shows you how to automate AdSec using the Grasshopper plugin, AdSecGH. This allows you to create visual workflows for tasks such as creating sections, running analyses, and extracting results.
By following this guide, you will:
- Install the AdSecGH plugin
- Activate your license
- Run a working Grasshopper example
Before proceeding, ensure you meet the general requirements for automating with AdSec.
Step 1: Install AdSecGH
Download and install the AdSecGH plugin. This may be done via the Rhino Package Manager.
Once installed:
- Open Rhino 8
- Launch Grasshopper
- Look for AdSec components in the Grasshopper toolbar
If AdSec components do not appear:
- Ensure the plugin was installed correctly
- Restart Rhino and Grasshopper
Step 2: Activate your license
AdSecGH requires an AdSec API license. To activate it, you will need:
- A license number
- A password
If you do not have these, contact Oasys support.
Prepare the activation sample file
The easiest way to activate your license is to download and open the sample file:
→ Download the activation sample file
Open it in Grasshopper and continue to "Run the file" below.
Alternatively, build the definition manually by following the steps below.
When generating the C# component in the definition, you can copy and paste the following code:
using System;
using System.Windows.Forms;

// Outputs
License_ID = "";
Password = "";

// Trigger using Activate
if (!(bool)Activate)
{
  return;
}

// Create form
Form prompt = new Form();
prompt.Width = 850;
prompt.Height = 420;
prompt.Text = "Activate Oasys AdSec API License";
prompt.StartPosition = FormStartPosition.CenterScreen;
prompt.FormBorderStyle = FormBorderStyle.FixedDialog;
prompt.MaximizeBox = false;
prompt.MinimizeBox = false;
prompt.TopMost = true;

// Title
Label titleLabel = new Label();
titleLabel.Left = 30;
titleLabel.Top = 20;
titleLabel.AutoSize = true;
titleLabel.Text = "Enter your License ID and Password";
titleLabel.Font = new System.Drawing.Font("Segoe UI", 14);

// License Label
Label licenseLabel = new Label();
licenseLabel.Left = 30;
licenseLabel.Top = 100;
licenseLabel.AutoSize = true;
licenseLabel.Text = "License ID";
licenseLabel.Font = new System.Drawing.Font("Segoe UI", 11);

// License TextBox
TextBox licenseTextBox = new TextBox();
licenseTextBox.Left = 220;
licenseTextBox.Top = 95;
licenseTextBox.Width = 580;
licenseTextBox.Font = new System.Drawing.Font("Segoe UI", 11);

// Password Label
Label passwordLabel = new Label();
passwordLabel.Left = 30;
passwordLabel.Top = 170;
passwordLabel.AutoSize = true;
passwordLabel.Text = "Password";
passwordLabel.Font = new System.Drawing.Font("Segoe UI", 11);

// Password TextBox
TextBox passwordTextBox = new TextBox();
passwordTextBox.Left = 220;
passwordTextBox.Top = 165;
passwordTextBox.Width = 580;
passwordTextBox.Font = new System.Drawing.Font("Segoe UI", 11);
passwordTextBox.UseSystemPasswordChar = true;

// Activate Button
Button okButton = new Button();
okButton.Text = "Activate";
okButton.Left = 520;
okButton.Top = 280;
okButton.Width = 140;
okButton.Height = 45;
okButton.Font = new System.Drawing.Font("Segoe UI", 10);
okButton.DialogResult = DialogResult.OK;

// Cancel Button
Button cancelButton = new Button();
cancelButton.Text = "Cancel";
cancelButton.Left = 680;
cancelButton.Top = 280;
cancelButton.Width = 140;
cancelButton.Height = 45;
cancelButton.Font = new System.Drawing.Font("Segoe UI", 10);
cancelButton.DialogResult = DialogResult.Cancel;

// Add controls
prompt.Controls.Add(titleLabel);
prompt.Controls.Add(licenseLabel);
prompt.Controls.Add(licenseTextBox);
prompt.Controls.Add(passwordLabel);
prompt.Controls.Add(passwordTextBox);
prompt.Controls.Add(okButton);
prompt.Controls.Add(cancelButton);


// Show dialog
DialogResult result = prompt.ShowDialog();

if (result == DialogResult.OK)
{
  License_ID = licenseTextBox.Text;
  Password = passwordTextBox.Text;
}
else
{
  License_ID = "";
  Password = "";
}

prompt.Dispose();
When generating the Python component in the definition, you can copy and paste the following code:
from Oasys.AdSec import ILicense

Status = ""

x = str(License_ID).strip()
y = str(Password).strip()

# Detect cancel
if x == "" and y == "":
    Status = "Activation cancelled"
else:
    try:
        if x == "" or y == "":
            Status = "Activation failed"
        else:
            res = ILicense.ActivateLicense(x, y)

            if res.ActionStatus:
                lines = []
                lines.append("Activation successful")

                # Product details
                if res.ProductInformation:
                    lines.append("\n--- Product ---")
                    lines.append(res.ProductInformation.ProductName)
                    lines.append(res.ProductInformation.Version)

                # License details
                if res.LicenseInformation:
                    lines.append("\n--- License ---")
                    lines.append("Company: {}".format(res.LicenseInformation.CompanyName))
                    lines.append("License ID: {}".format(res.LicenseInformation.LicenseId))
                    lines.append("Seats: {}".format(res.LicenseInformation.NumberOfSeats))
                    lines.append("Days Left: {}".format(res.LicenseInformation.NumberOfDays))

                Status = "\n".join(lines)

            else:
                Status = "Activation failed"

    except:
        Status = "Activation failed"
If you connect a panel to the out output of the Python component, you will see the license activation results when running the definition.
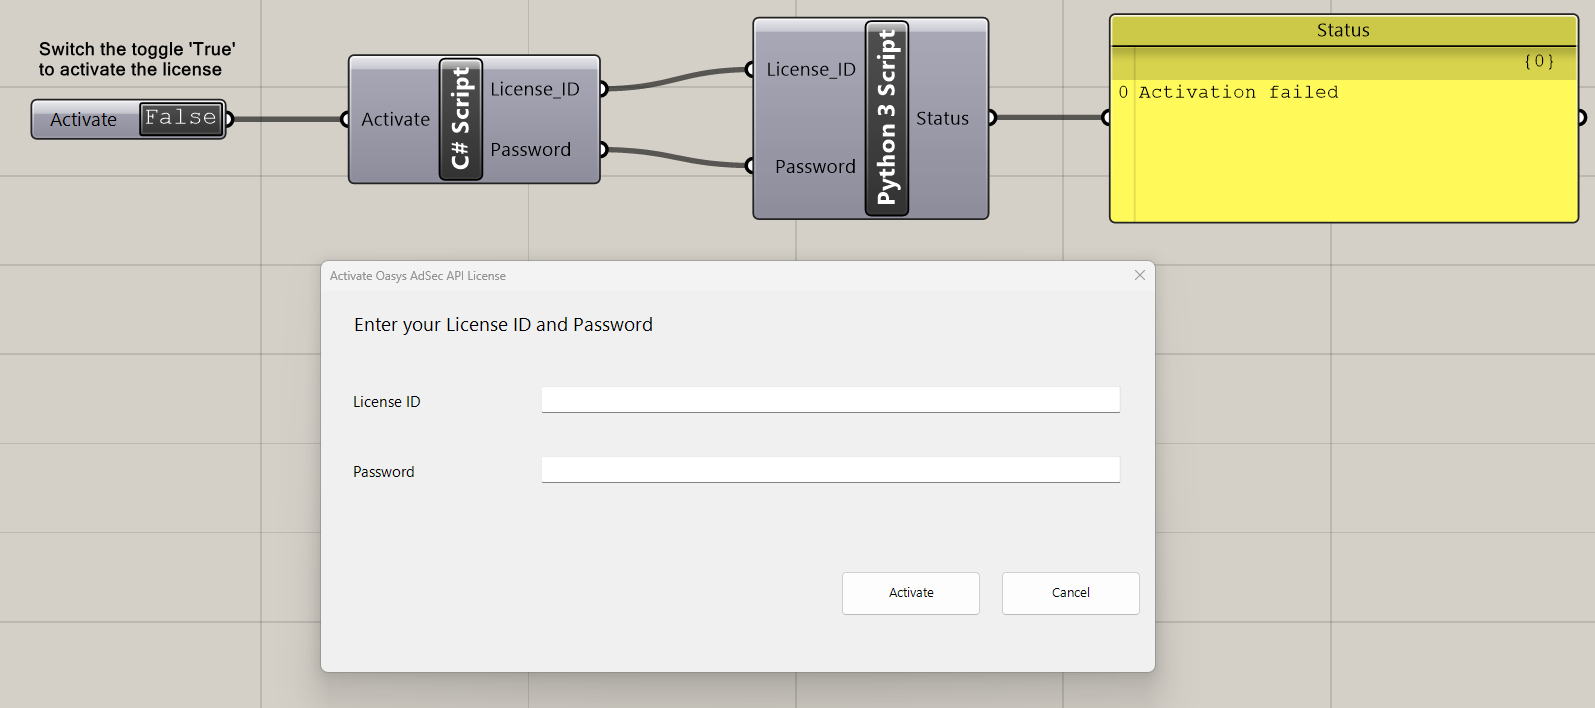
Run the file
- Switch the Activate toggle to True
- Enter your license number and password in the pop-up
- Click Activate
Step 3: Verify activation
Your license is successfully activated when the Grasshopper definition runs without errors and you do not see any licensing warnings.
If activation fails
Check the following:
- All requirements are met
- Your license number and password are correct
- The activation step has been completed in the definition
If the issue persists, contact Oasys support.
Step 4: Run your first workflow
You are now ready to run AdSec automations within Grasshopper. To get started, you can run one of the example files provided below.
Step 5: You are ready to build
You have now:
- Installed AdSecGH
- Activated your license
- Run a sample definition
Start building with AdSecGH